


'MushBucket' Mushroom Bucket Grow Kit
'MushBucket' Mushroom Bucket Grow Kit
SKU:LGL-BUNDLE-BUCKET-PO1
Grow Gourmet Mushrooms at Home
At North Spore, our journey began with oyster mushrooms in buckets. In fact, bucket-grown oysters were our first major harvests, and for years, they were our bread and butter. This kit is a tribute to those roots: simple, effective, and designed for results.
Whether you're a first-time cultivator or a seasoned mushroom enthusiast, this beginner-friendly bucket kit makes it easy to grow mushrooms in almost any environment. Designed for simplicity and performance, the pre-drilled food-grade bucket is ready to use right out of the box—no special tools or experience required!
This complete system provides everything you need to cultivate mushrooms at home (just bring your own stock pot for pasteurization). The included chopped straw is shredded to the ideal size for colonization, while the premium North Spore grain spawn delivers fast and reliable growth. From inoculation to pinning, you could see results in as little as 7 days!
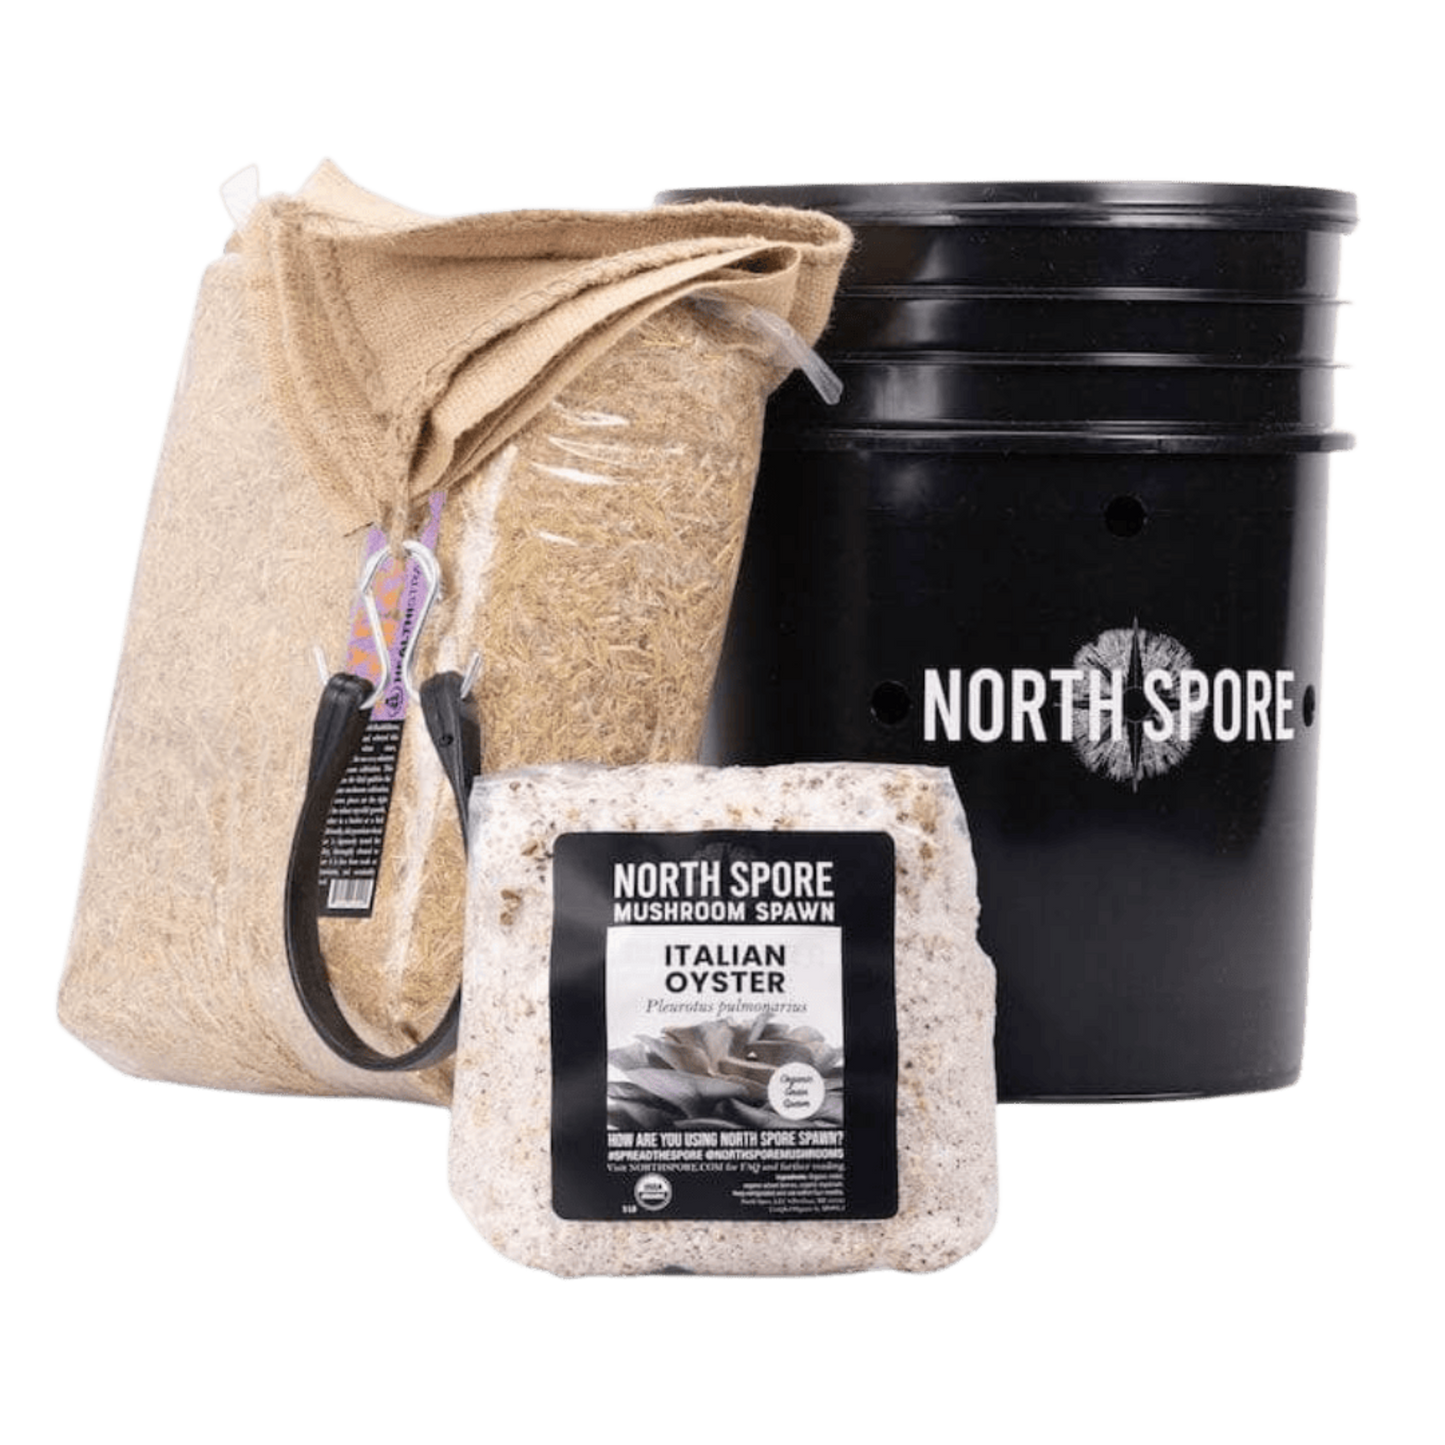
Each Complete Bucket Kit Includes:
- (1) Pre-drilled, food-grade mushroom bucket
- (1) Bag of pesticide-free chopped straw
- (1) 3 lb bag of oyster mushroom grain spawn
- (1) Burlap sack
- (1) Bungie cord
Key Features & Benefits
- Easy-to-use setup with pre-drilled holes for optimal airflow
- Complete growing solution, no special tools required
- Quick turnaround, pinning can begin in just 7–10 days
- Designed for indoor and outdoor use
- Performs exceptionally well in warm, summer conditions
- Shredded straw promotes even colonization and faster growth
Ready to start your mushroom-growing adventure? This kit offers a simple, satisfying way to explore the world of fungi, whether you're growing on a balcony, in a basement, or out in the backyard.
Strain Options
- Blue Oyster (Pleurotus ostreatus): A cold-tolerant variety with bluish-gray caps and a rich, savory flavor
- Italian Oyster (Pleurotus pulmonarius): Milder in flavor and well-suited to warmer growing conditions
- Snow Oyster (Pleurotus ostreatus): White, delicate caps with excellent culinary versatility
- Pink Oyster (Pleurotus djamor): Vivid pink mushrooms with a seafood-like aroma, perfect for summer grows
Caring for Your Spawn
- Open the box as soon as possible and remove the spawn
- Unfold the top of the spawn bag to create air space
- Make sure the filter patch is not covered, so the mycelium can breathe
- Store the spawn in the refrigerator if you are not using it right away
- For best results, use within four to six weeks


Product Details
-
Product Category
Edibles
-
Product Subcategory:
Mushrooms
-
Botanical Name:
Pleurotus ostreatus, Pleurotus pulmonarius, Pleurotus ostreatus, Pleurotus djamor
-
Does Not Ship To:
AZ
-
Mature Height:
-
Mature Width:
-
Growing Zone:
-
Indoor Growing:
-
Sunlight:
Indirect Light
-
Growth Rate:
-
Harvest Time:
-
Bloom Time:

Planting Directions
<h2>How to Use the 'MushBucket' Mushroom Grow Kit</h2> <p>Follow these steps to grow oyster mushrooms using your North Spore kit. This kit is beginner-friendly and includes everything except a stock pot for pasteurization. Here's how to get started:</p> <h2>Step-by-Step Instructions</h2> <ul> <li><strong>1. Prepare the Straw:</strong> Bring water to 160–170°F in a large stock pot. Submerge the chopped straw for 1 hour to pasteurize. Keep the temperature steady. Drain thoroughly and cool completely.</li> <li><strong>2. Inoculate the Straw:</strong> Mix the fully cooled, moist straw with the mushroom grain spawn (3 lb bag). Mix evenly using clean hands or gloves. The straw should be damp but not dripping water.</li> <li><strong>3. Fill the Bucket:</strong> Layer the inoculated straw into the pre-drilled bucket, pressing it down gently to pack but not compress too tightly. Fill to the top. Place the burlap over the top and secure with the included bungie cord.</li> <li><strong>4. Colonization:</strong> Place the bucket in a warm (65–75°F), dark or dim location with some airflow. Do not cover the holes. Mycelium should colonize the straw in 7–14 days, turning white.</li> <li><strong>5. Initiate Fruiting:</strong> Once fully colonized (solid white), move the bucket to a spot with indirect light and high humidity (bathroom, greenhouse, or misted area). Mist the holes 2–3 times daily to keep them moist.</li> <li><strong>6. Harvest:</strong> Mushrooms will start pinning (tiny clusters) in 7–10 days after moving to fruiting conditions. Harvest when caps are fully open but not flattened. Twist and pull gently at the base.</li> </ul> <h2>Aftercare</h2> <p>Keep misting daily. The bucket can produce multiple flushes (harvests). Let it rest for 7 days between flushes, then resume misting.</p> <p><strong>Tip:</strong> For patio or balcony grows, ensure the bucket is shaded, moist, and protected from wind.</p>
FAQs
<h2>FAQs for the MushBucket Mushroom Bucket Grow Kit</h2> <ul> <li> <strong>1. How soon will mushrooms start growing after I set up the kit?</strong><br> Most users see mushroom pinning (baby mushrooms forming) in just 7–10 days after inoculation, depending on the temperature and moisture. Full harvests can follow within 2–3 weeks. Warm conditions speed things up, especially for varieties like Pink and Italian Oyster. </li> <li> <strong>2. Can I grow mushrooms indoors with this kit?</strong><br> Yes! The MushBucket is designed for both indoor and outdoor use. Indoors, it thrives in spaces like kitchens, basements, or laundry rooms—anywhere with indirect light and stable humidity. It's a great way to bring a bit of nature inside without needing a garden. </li> <li> <strong>3. Do I need to buy anything else to get started?</strong><br> The kit includes everything except one item: you'll need a stock pot to pasteurize the chopped straw before mixing in the mushroom spawn. Aside from that, no special tools or materials are required. </li> <li> <strong>4. Which oyster mushroom strain should I choose?</strong><br> Choose based on your growing conditions and taste: <ul> <li><strong>Blue Oyster:</strong> Best for cooler temps, robust umami flavor.</li> <li><strong>Italian Oyster:</strong> Handles heat well, mild taste.</li> <li><strong>Snow Oyster:</strong> Versatile white caps, neutral flavor for any dish.</li> <li><strong>Pink Oyster:</strong> Great for warm spots, fast grower, seafood aroma.</li> </ul> </li> <li> <strong>5. How many mushrooms can I expect to harvest?</strong><br> You can expect multiple flushes (harvests) from a single bucket, with each flush producing several clusters of mushrooms. Total yield varies based on conditions but generally falls between 1.5 to 3 pounds over time. </li> </ul>